Drain valves, including manual ball valves and automatic drain valves, are essential pipe fittings in irrigation and piping systems. These valves help manage water flow, prevent pipe damage from freezing, and facilitate the removal of sediment or accumulated water. Manual ball valves provide simple and cost-effective control, requiring manual operation to open or close the valve, making them ideal for systems that need periodic drainage. On the other hand, automatic drain valves are pressure-sensitive and operate automatically, making them perfect for systems in cold climates or areas with frequent on-and-off water usage. Together, these pipe fittings ensure efficient system maintenance and protection, extending the lifespan of the pipeline infrastructure.
Reasons for setting up drain valves in irrigation pipe systems
1. Antifreeze protection: In cold climates, the volume of accumulated water in pipes expands by about 1/11 when it freezes, which may cause pipes or connecting parts to rupture. Drain valves can empty pipes in winter to avoid freezing damage.
2. Inspection and maintenance: The accumulated water needs to be emptied during system inspection to facilitate safe operation of operators.
3. Removal of sediment: Long-term operation of pipes may accumulate silt or impurities. Drain valves can regularly discharge accumulated water containing sediment to maintain water quality and flow.
4. System safety: Residual accumulated water in pipes will increase pipe wall pressure and accelerate corrosion. Drain valves can reduce local stress.
5. Terrain adaptability: In undulating terrain, pipes fluctuate with the terrain, and water is easily accumulated in low places. Drain valves are necessary measures to deal with complex terrain.
Types and applicable scenarios of drain valves
Based on the driving mode, function and structure, the commonly used drain valves in irrigation systems are as follows:
Types:
1. Manual ball valve
Working principle: Manually rotate the valve stem to control opening/closing
Applicable scenarios: Systems that require periodic drainage; projects with limited budgets
Advantages and disadvantages:
Advantages: Low cost and simple maintenance;
Disadvantages: Manual operation is required, which may waste water.
2. Automatic drain valve
Working principle: Pressure sensitive (such as 3 psi valve automatic switch)
Applicable scenarios: Automation systems in cold areas; irrigation areas with frequent opening and closing
Advantages and disadvantages:
Advantages: Automatic operation;
Disadvantages: Susceptible to system damage caused by frequent opening and closing, regular maintenance is required.
3. Side valve
Working principle: Intermittently reduce and control flow, full open/full close
Applicable scenarios: Mainly through the drain pipe; scenarios where grille filtration is required
Advantages and disadvantages:
Advantages: Good sealing and two-way flow;
Disadvantages: Only applicable to full open/full close, without flow
4. Butterfly valve
Working principle: Rotating butterfly plate to adjust flow
Applicable scenarios: low-pressure pipeline system; fast-opening drain port
Advantages and disadvantages:
Advantages: small size, easy installation;
Disadvantages: poor sealing under high pressure.
5. Composite valve
Working principle: Combining gas and water functions
Applicable scenarios: long-distance water pipeline
Advantages and disadvantages:
Advantages: integrated design, integrated gas and water control;
Disadvantages: high cost.
Selection suggestions
• Automatic drain valves (antifreeze automation) are preferred in cold areas;
• Manual ball valves are recommended for frequent maintenance scenarios (low maintenance cost);
• Gate valves are suitable for the end of large pipe networks (high sealing requirements).
Design and layout location
The layout of the drain valve must follow the "lowest point principle" and consider the pipe network structure:
1. The lowest point of the system: the lowest point of the main/branch pipe must be set to ensure gravity drainage.
2. Pipeline end:
• Branch network: Each trunk and branch pipe end must be set;
• Ring network: At least one is set between every two valves.
3. Topographic key points:
• Local depression: The low-lying part of the pipeline that follows the undulating terrain;
• Slope change point: One is set for every 6.5 feet (about 2 meters) elevation difference.
4. Beside ancillary facilities:
• Coordinated arrangement with valve wells and exhaust valve wells;
• Close to drainage outlets (such as rainwater systems) to avoid water backflow.
Installation precautions
Preliminary preparation
1. Valve selection:
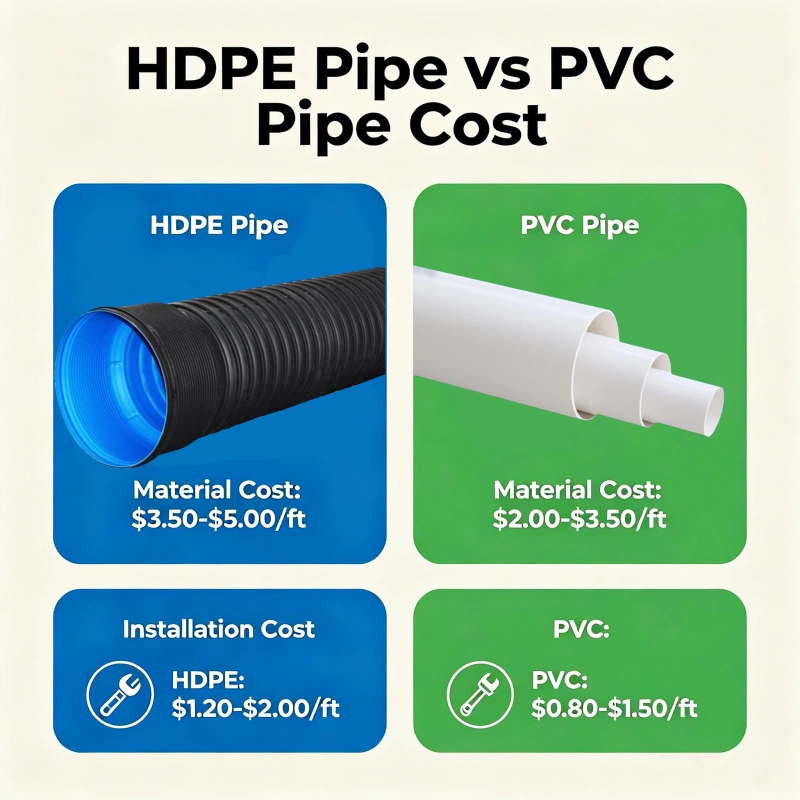
• Determine the diameter of the drainage valve according to the pipe diameter (usually 1/4~1/5 of the main pipe diameter);
• The material must be corrosion-resistant (such as UPVC, ductile iron) and adapt to the soil environment.
2. Location confirmation:
• Artificially deepen the trench to create a low point (when there is no natural slope);
• When there are multiple parallel pipes, all drainage valves are centrally arranged (simplifying maintenance).
Installation process
1. Foundation treatment:
• Fill the trench with a coarse sand layer (thickness ≥ 30 cm) to prevent soil particles from clogging the valve;
• Soft soil foundations need to be reinforced (such as gravel pads in silt areas).
2. Sealing and connection:
• Use sealing tape/glue to ensure that the interface is leak-free;
• Keep the valve horizontal for horizontal pipes; pay attention to the direction of water flow (from bottom to top) for vertical pipes.
3. Valve well design:
• Well cover height: paved ground is flush with the ground; green space is 200 mm above the ground;
• Drain pipes and telescopic devices are installed in the well to prevent foundation settlement from damaging the valve.
Commissioning and maintenance
1. Functional test:
• Check the opening and closing flexibility and drainage smoothness;
• The drainage valve automatically opens after simulating pump shutdown (automatic valves need to verify the pressure threshold).
2. Regular maintenance:
• Manual valve: clean sediment before the irrigation season every year;
• Automatic valve: check the sensor/filter every month (to prevent root or particle clogging).
Countermeasures for special scenarios
Cold areas: Install drain valves and exhaust valves in coordination (exhaust at high places and drain at low places) to avoid frost heave
Steep slope terrain: Install a composite exhaust valve every 1,000 meters to cooperate with the drain valve to alleviate slug flow
High sediment content: Add a sand settling tank downstream of the drain valve and clean it regularly
Water quality sensitive areas: When the drain valve is connected to the rainwater system, install a check valve to prevent backflow pollution
Key tips
• Automatic drain valves need to be equipped with filters (such as Y-type filters) to prevent impurities from causing loose closure;
• In multi-area irrigation systems, each independent area needs to have a separate drain valve.
FAQ
1. Why are drain valves needed in irrigation systems?
Drain valves protect against freezing in cold climates, aid in maintenance, remove sediment, reduce pressure, and address water accumulation in low areas.
2. What types of drain valves are used in irrigation systems?
Manual Ball Valve: Low cost, manual operation, may waste water.
Automatic Drain Valve: Pressure-sensitive, automatic, but needs maintenance.
Side Valve: Good sealing, for full open/close.
Butterfly Valve: For low pressure, fast opening.
Composite Valve: Combines gas and water control, high cost.
3. How do I choose the right drain valve?
Cold areas: Use automatic valves for antifreeze.
Frequent maintenance: Manual ball valves are best.
Large systems: Use gate valves for high sealing.
4. Where should drain valves be placed?
At the lowest point of the system.
At the ends of pipes.
At key points with slope changes.
5. What are the installation tips?
Choose a valve 1/4 to 1/5 the main pipe diameter.
Use coarse sand for the foundation.
Ensure horizontal installation and leak-free connections.
6. How should drain valves be maintained?
Manual valves: Clean annually.
Automatic valves: Check sensors monthly.
Perform regular function tests.
7. How to handle cold areas or steep slopes?
Cold areas: Install drain and exhaust valves at different levels.
Steep slopes: Use composite exhaust valves every 1,000 meters.
8. What about sediment or water quality issues?
Sediment: Add a sand settling tank.
Water quality: Use a check valve for rainwater connections.
214958.webp)

321608.webp)
916.webp)
204.webp)
659.webp)
185.webp)
312.webp)
849.webp)
587.webp)
767.webp)