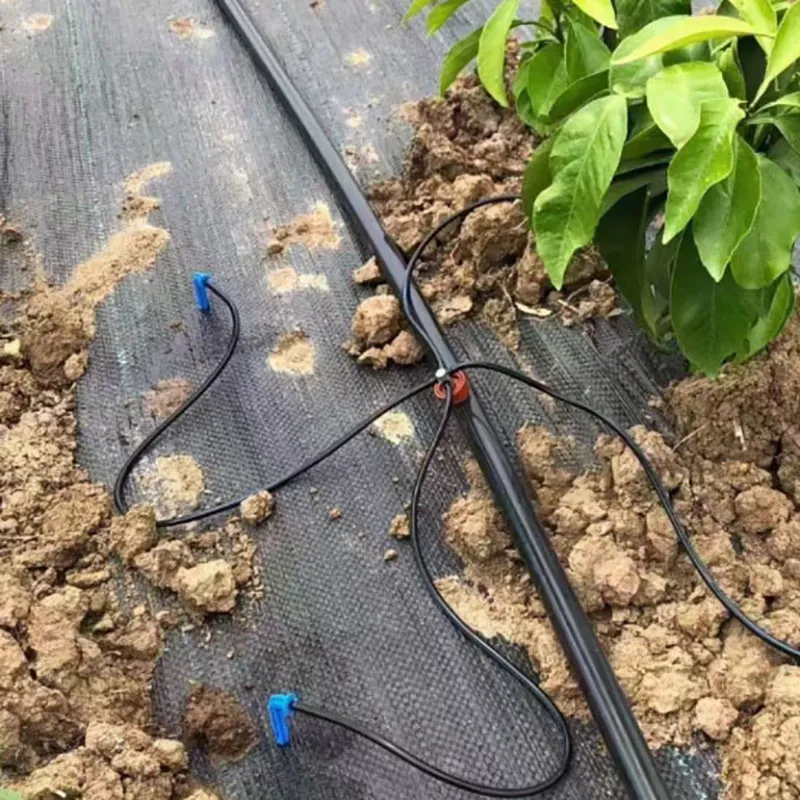
Installation Method of Tube-mounted Dripper
Applicable Scenarios: Greenhouses, nurseries, potted flowers, substrate cultivation and other crops that require precise irrigation.
Installation Steps
1. Preparation for drilling holes:
• Use a special puncher (such as 2mm diameter) to vertically drill holes on the PE capillary tube. Only pierce the tube wall on one side to avoid excessive force that may cause the opposite tube wall to rupture.
• Install the dripper immediately after drilling to prevent debris from entering the hole.
Dripper Installation
• Insert the dripper water inlet (with double half-moon filter window) inward into the hole to ensure complete embedding.
• If a spiked self-piercing dripper (such as Netafim PCJ) is used, drilling and embedding can be completed simultaneously.
Accessory connection
• If you need to connect a microtube or water distributor, it is recommended to assemble it in advance and then install it as a whole to avoid damaging the hole position.
• Threaded interface types (such as 10-32 or ½ inch FPT) need to be sealed with raw tape, and then manually tightened to test for leaks.
Notes:
• PE pipe compatibility: Not all PE pipes are applicable. You need to choose pipes that match the specifications of the dripper, otherwise it is easy to leak.
• Direction control: The outlet must face upward to avoid silt backflow and blockage.
• Pressure debugging: The first start-up requires slow pressure increase to observe the uniformity of the water output. The recommended working pressure is 1.0~4.0 bar.
• Anti-counterfeiting verification: Authentic drippers (such as Netafim PCJ) have clear flow marks and pure colors, and imitations are prone to flow deviations.
Installation method of embedded drip irrigation pipes
Applicable scenarios: field crops, orchards, vegetable bases, etc. require long-distance uniform irrigation.
Installation steps
1. Preparation before laying:
• Clean up stones and stubble in the field, and level the ground with a slope of ≤15° to ensure that the ground is flat.
• Plan the path according to the crop row direction, leaving 1.5%~2% expansion margin (to prevent thermal expansion and contraction fracture).
2. Direction control:
• The dripper maze flow channel (embossed convex side) must be laid upwards, and reverse or twisting is prohibited.
3. Branch pipe connection:
• Use a special puncher to vertically punch holes in the branch pipe (depth ≤ 1/2 pipe diameter), insert the bypass and then connect the drip irrigation pipe.
4. End treatment:
• Fold the tail end of the drip irrigation pipe in half and seal it with the cut pipe head or plug.
Notes:
• Soil adaptation:
• Clay soil: reduce the dripper spacing to 20~30cm, extend the dripping time to promote penetration.
• Sandy soil: expand the dripper spacing to 40~50cm, and increase the frequency to prevent side leakage.
• Anti-blocking measures: A filter with a mesh size of 80 or above must be installed and flushed regularly.
• Anti-burn: When laying on the surface, cover with thin soil or bury shallowly to avoid water accumulation in the ground film to form a lens effect and burn the pipe belt.
Installation method of patch drip irrigation belt
Applicable scenarios: field economic crops, greenhouses (such as cotton, watermelon).
Installation steps:
1. Branch pipe drilling
• Use special tools to drill holes in the branch pipe (PE/PVC/water belt), and the hole diameter matches the bypass size.
2. Connect the drip irrigation belt
• Insert the bypass into the branch pipe hole, and the drip irrigation belt is connected to the bypass to ensure that the direction of the water inlet is consistent with the water flow.
3. System flushing
• Slowly open the valve for the first water flow, flush for 5~10 minutes, and seal the end after removing impurities.
Precautions
• Pressure control: Working pressure 0.02~0.25MPa, flat ground laying length ≤80 meters (50 meters recommended).
• Flow selection: Select a dripper of 1.2~3.2 L/h according to the water demand of the crop, and select a low flow rate to prevent water accumulation in clay soil.
• Maintenance requirements: Check the blockage of the dripper regularly, and acid washing can remove carbonate scaling.
Installation method of side seam drip irrigation belt
Structural features: No internal dripper, the flow channel is formed in one step, low cost but weak hydraulic performance.
Installation points:
• Direction control: The convex surface of the labyrinth faces upward, which is opposite to the patch type; the water inlet needs to be tightened after the snap tee is installed.
• Connection specification: The drip irrigation belt is cut into a flat shape to connect the bypass to avoid water leakage.
Notes:
• Applicable scenarios: Only flat plots (slope ≤5°) are recommended, and uneven terrain can easily lead to uneven water output.
• Anti-blocking design: There are few filter holes at the flow channel entrance, and a filter with a mesh size of 120 or above is required.
General precautions
1. Water quality treatment: All types must be equipped with filters (mesh/laminated), and the particle size of water impurities is <0.6mm.
2. System debugging: The pressure-flow curve needs to be tested for the first operation to ensure uniformity ≥95%.
3. Seasonal management: Empty the pipes in winter to prevent freezing and cracking, and stop using during the freezing period.
4. Economic suggestions:
• The cost of the internal patch drip irrigation tape is about ¥0.12~0.14/m, and it can be used for 5 years if properly installed.
• The side seam type has low cost but short life (about 2~3 years), which is suitable for short-term crops.
FAQ
Q1: What types of crops are suitable for tube-mounted drippers?
A1: Tube-mounted drippers are ideal for crops that require precise water control, such as greenhouse vegetables, potted flowers, nurseries, and substrate cultivation systems.
Q2: How do I avoid leaks when installing drippers on PE pipes?
A2: Use a specialized puncher to drill one side of the pipe wall vertically and insert the dripper immediately. Ensure the PE pipe matches the dripper specifications to prevent poor sealing and leaks.
Q3: What is the correct direction when laying embedded drip irrigation pipes?
A3: The embossed side (where the dripper’s maze flow channel is located) must always face upward to ensure proper water distribution and prevent clogging.
Q4: Can drip irrigation belts be used on sloped fields?
A4: Side-seam drip irrigation belts are only recommended for flat fields with slopes less than 5°. For slopes up to 15°, embedded drip lines with better hydraulic performance are preferable.
Q5: What kind of filter should be used to prevent clogging?
A5:For most systems: use filters with mesh size ≥80.
For side-seam belts: use finer filters with mesh size ≥120.
Regular flushing and filter maintenance are essential to avoid blockages.
Q6: What is the recommended pressure range for different drip systems?
A6:Tube-mounted drippers: 1.0–4.0 bar
Patch drip tape: 0.02–0.25 MPa (50 meters max length on flat ground)
Use pressure regulators to ensure consistent output.
Q7: How do I maintain drip irrigation systems between seasons?
A7: Drain all pipelines before winter to prevent freezing and cracking. Perform acid flushing if scaling (carbonate buildup) is observed, and regularly check for dripper clogging.
Q8: How long do different drip tapes typically last?
A8:Patch drip tape (internal drippers): Around 5 years with proper installation.
Side-seam drip tape: Cheaper but lasts 2–3 years, suitable for short-cycle crops.
916.webp)
204.webp)
659.webp)
185.webp)
312.webp)
849.webp)
587.webp)
767.webp)